Whilst leafing through ELLE’s September edition, I saw some
great loafers by Marni. They were leather, brown and white, but with a long
black fringe at the front to cover (I assume) the lacing, which tied up on top
of the fringe. The colours aren’t completely my style, but I did love the
design!
Sadly, I don’t have money for designer shoes (or designer
anything!)
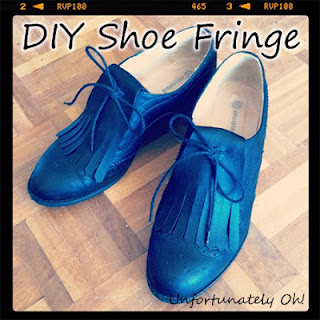
So I dug out my old mid-heel brogues (from Primark, kingdom
of cheapness!) and some scraps of faux leather left over from a fancy dress
costume, and got to work...
Granted, Marni’s version had a double layer of fringe, but
in all honesty I was feeling too lazy to set up the sewing machine. Plus I
think one layer looks just fine on these shoes (Marni’s are a lot chunkier).
This is a great, non-permanent way to get a different look
from a pair of shoes!
Drawing a pattern for the fringe is a little fiddly, though
it’s harder to explain it than it is to do
it.
Hopefully this tutorial explains clearly. However if you
have any questions please comment to ask! :)
You’ll need:
Shoes
A piece of leather/leather-look vinyl
Scissors or a rotary cutter
Ruler
Tape measure
Dressmaker’s pencil
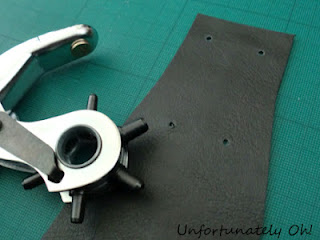
Leather punch*
* If you don’t have one of these, try a big glob of blue
tack and a nail (health and safety officers across the land are probably
wincing at that suggestion...)
1. Take measurements of your shoes:
a) The distance from where you want the end of the fringe to fall, up the front and overlapping to just past the top lacing holes of the shoe. Note where the overlap occurs. In the example, the overlap is at 4.5”. The overall measurement is 6.25”
b) Measurement across the toe of your shoe (desired width of
fringe). Pictured measurement: 3.25”
c) Measurement across top of tongue. Pictured measurement: 2”
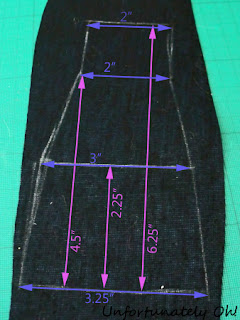
2. This step is
difficult to explain; I played around a lot at this point! Hopefully the
annotations on the picture will help.
a) Draw out the fringe pattern onto the back of your
leather/vinyl.
b) Draw a line for the width of your fringe, and then a
parallel line where the fringe will overlap the tongue of the shoe (in the example, a 3.25” line and a 2” line,
spaced apart by 4.5”).
c) Draw another parallel line between them: the distance from the first (longer) line should be the length you want the cut fringe to be. (Example: 2.25” apart, 3” wide) Join this middle line to the widest line.
d) Then join the middle line to the narrowest line.
e) To draw the ‘inside’ part of the fringe: Measuring from
the widest line, draw a parallel line using the overall measurement from step
1a) and the width from step 1b) (Example:
6.25” apart, 2” wide). Join the two lines together at either end. (This
section should be square/rectangular).
f) Cut out.
I was too lazy to go
through all of this twice, so for the second shoe I just drew around the first
piece!
3. Mark evenly-spaced cutting lines for the fringe between
the bottom two lines. Make a small dot between each line: this will be the
‘point’ of each part of the fringe.
4. Draw another line a fraction of an inch from the bottom
line: this is the overall depth of each point.
5. Get cutting! Using a ruler, cut the lines from step 3
first. To make the points, cut short lines between the little dots you drew in
step 3 and the line you drew in step 4.
6. To measure where to put the holes: take the laces out of
the top pair of eyelets on the shoe. Tuck the top/inside part of the fringe,
wrong side up, between the lacing and the tongue. Poke a pencil inside each
eyelet to mark on the fabric where the holes go.
7. Punch the first set of holes. Then fold the fringe over
(right side outwards) at the shorter line drawn in step 2b). Mark through the
holes you just made onto the inside of the fabric, and punch the second set of
holes.
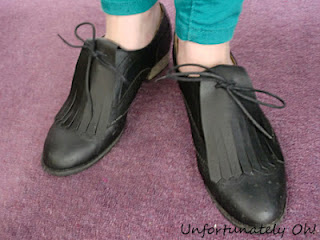
8. To attach to shoe:
a) Remove laces from top pair of eyelets. Cross laces over
and thread through the top pair of holes on the fringe, from right side to
wrong side.
b) Tuck the top of the fringe into the shoe, between the
laces and the tongue. Thread laces through the top eyelets of the shoe (do not
cross them over).
c) Fold fringe over the front of the shoe. Thread the laces
through the lower pair of holes on the fringe and tie as you would normally.
9. Wear them out!
I’m now thinking of making some of these for a pair of ankle
boots!
In the example shown, I made fringe to match the shoe, but
of course you could make something that contrasts!


Wow! That was brave and the results are so cool.
ReplyDelete<3 Christina at I Gotta Create!
Wildly Original linky party is open.
Wow, adorable. Completely changed the shoes, now pretty stylish! Thanks for sharing your creative inspiration with Sunday’s Best – you helped make the party a success!
ReplyDeleteSuch a smart idea! Love these. Thanks so much for sharing at Etcetorize this week~
ReplyDelete