


Do you ever have days when you want to make something, but don't want to put in hours of time and effort to do it?
I had one of those days, and put together a few of these easy 'higgledy-piggledy' bead bracelets. (Called so because I threaded beads on at random!)
This is a great little stash-busting project, but also a child-friendly craft project!

Here is a bracelet I made when I was around 7 years old. In this how-to, I explain an alternative way of making a closure to finish off the bracelets!
It is so simple to make these bracelets that it barely needs explaining, but here's a quick tutorial.

Time needed:
5-10 minutes
You'll need:
Jewellery wire*
Assortment of beads
*The wire I used was around 1mm. Try not to use wire that is too soft, else it will bend too easily and likely break!
Tools:
Wire cutters
Flat-nose pliers
Round-nose pliers
Tape measure
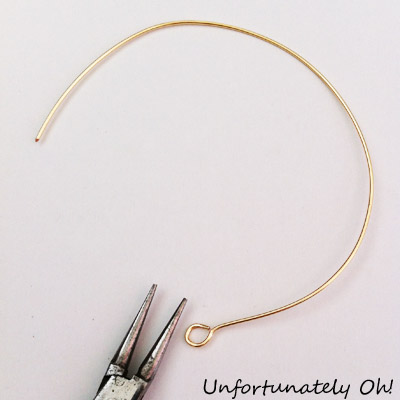
1. Cut a piece of wire 2 inches bigger than your wrist measurement, or more if you want a looser bracelet. Use round-nose pliers to make a loop in one end.

2. Thread on beads in the order you want. I like to add the beads on at random! When you have around 1 inch left over, bend the wire at an angle using flat-nose pliers, to stop the beads coming off.
3. There are several ways you can finish the bracelet:

For a closure attached directly to the bracelet:
a) Use flat-nose pliers to bend the wire back on itself.
b) Bend the end 3mm or so of the wire back in itself with flat-nose pliers (this stops sharp edges sticking out and scratching). Bend the remaining length of wire into a hook shape using round-nose pliers.
c) Check the hook goes easily through the loop you made in step 1.
To finish without a closure:
d) Alternatively, simply use round-nose pliers to create another loop at this end of the bracelet, and trim off excess wire with wire cutters.

For a separate closure:
Finish off as in step d above.
Bend the end of a 2 inch piece of wire around on itself. Curl this end around round-nose pliers and then curl back the opposite way to make an S-shape with a loop on one end. (Sorry for the rubbish picture, this one was an after-thought!)
4. You're done! Be proud :)

Will be linking up at the usual link parties, listed at the bottom of the page!
I just made one of these and I love it! Thanks for putting up this tutorial. It used up a bunch of random beads :O) In case you are interested I took a pic of it.
ReplyDeletehiggeldy-piggledy? lol That's a new one to me. Love the bracelets though. The beading turned out really pretty.
ReplyDeleteHi, Kei - great project for instant gratification!
ReplyDeleteI always want to do a quick project to fill my creative itch...found you through tatertots & jello...
ReplyDeleteHey Kei, thanks for joining our party this week.
ReplyDeleteThese are just too cool. Yes, I love projects I can finish quickly and I am loving beaded bracelets right now. Just dropping in from The Gunny Sack and am now following you via Linky. I would so love if you would like up any of your awesome post at Freedom Fridays. SO hoping to see you (and your bracelets) there!
ReplyDeleteI love quick and easy projects like this. My niece usually makes at least one of these when she comes to visit. She just has to craft when she's here! Thanks so much for sharing at Etcetorize this week~
ReplyDeleteThose are so cute! We'd have to agree - we LOVE beaded bracelets right now! Thanks for sharing your ideas on "Strut Your Stuff" Saturday! We hope to see you again! -The Sisters
ReplyDelete