Saturday 28 May 2011

Tutorial: Ethnic Disc Necklace

After an inspiring trip to Accessorize, I rummaged through my crafting drawers and came up with this:

coins necklace
£0, me
Despite the distinctive style, this ethnic disc necklace will compliment all kinds of outfits and occasions--be it with a bikini on a beach in St Tropez, jeans and a tee at a barbecue or worn with an evening dress!

The inspiration is Accessorize’s ‘Embossed Disc Collar Necklace’:
 £14, Accessorize

My version cost me very little since it was all stuff I had to hand. The coins I used were given to me by a friend (along with the ones I used in my Gothic Comedy Scarf). The thick chain was an old belt and the other chains were bought fairly cheaply too (these are project leftovers)
Everything else was pilfered from the remains of my parents’ jewellery-making supplies!
 
Read on for a how-to.

disc necklace

Time needed: 1-2 hours

You’ll need:
Chain (three widths/types)
Beads (I used 15)
Spacer beads (if appropriate)
Metal disks/coins (two with a hole at top and bottom)
2 connectors (preferably 3-hole)
Jump rings
Clasp
Side cutters
Round-nose pliers
Flat-nose pliers


embossed coin necklace

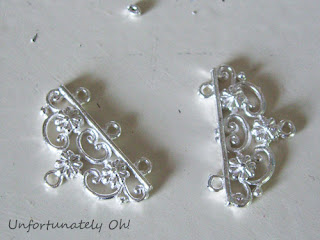
1. Since I only had 4-hole connectors, I cut the centre hole from one side of the connectors. You might need to do the same if you have the same issue as me!


embossed disc necklace

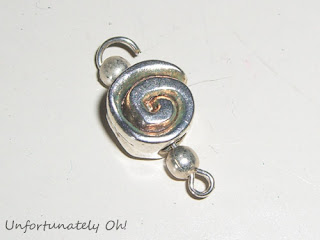
2. Slide your beads onto eye pins, between spacer beads if necessary. I used spacers because the holes in the spiral beads were so big they slipped over the eye pins! Bend the tops of the eye pins over into loops and cut off the excess 


ethnic disc necklace
 
3. Cut a 5.5 inch (approx) length of your thickest chain and a 7 inch (approx) length of the thinner chain. Fix the beads evenly between the two lengths of chain. Make the spaces on the thinner, bottom chain a little bigger than the top chain so that the necklace curves a little.


ethnic coin necklace

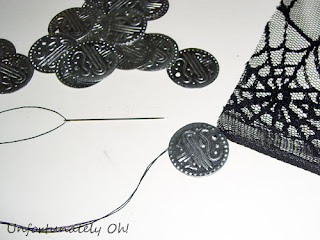
4. Attach the coins/disks to the thinner chain


coin necklace how to

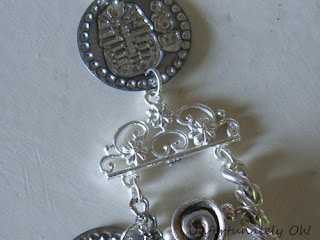
5. Use jump rings to fix the main section of the necklace to the connectors. On the single-loop end, attach the coins/disks with the two holes. I ended up making an extra hole in the bottom of two of my coins/disks because I didn’t have anything more appropriate! 


handmade necklace tutorial

6. Cut two equal lengths of your third chain (I used 5 inches each side) and fix them to the top of the coins with jump rings. Add on a clasp and you’re done!


Linking up at:

Saturday 21 May 2011

Tutorial: Ancestry of Tibet Necklace

The world is full of inspiration, be it wind turbines silhouetted against a fiery Cornish sunset, the greased and oiled inner workings of machinery or the pages of a magazine.

My most recent inspiration is Joe Browns. Yes, again. (Regular readers will remember my Gothic Comedy scarf a couple of weeks back, inspired by Joe Browns’ Funky Buddha scarf.)

Joe Browns are currently selling a ‘Faith and Love’ necklace for £14.95. Not bad!
I love the design, but I’m not the type to wear lots of hearts or beads stamped with ‘love’, ‘trust’, ‘peace’, etc.

After putting on my thinking cap and doing a little bead-shopping, I came up with this:

I’m calling it my ‘Ancestry of Tibet’ necklace (because everything needs a name!)
The beads I used were partly what I had to hand (the skulls) and partly what I bought from ebay. The ebayed beads were sold as ‘Tibetan silver beads’ and were a steal at £3.19 (including postage) for 90 beads!

Here is Joe Brown’s  gorgeous ‘Faith and Love’ necklace:


No crafty post would be complete without a tutorial, so read on for a how-to!


Time needed: 1-2 hours

You’ll need:
Selection of beads (I used 42)
Spacer beads (twice as many as regular beads)*
Crimps (twice as many as regular beads)
Tiger tail beading wire
2 split rings
2 jump rings
Clasp
Wire cutters
Round nose pliers
Flat nose pliers
Ruler
Patience!

*I only used spacer beads because the holes in the other beads were too big and the beads slipped over the crimps. If your beads have smaller holes, you don’t need to worry about the spacers!


1. Cut six strands of tiger tail at different lengths: 17", 18", 18.5", 19", 20" and 20.5". 

2. Take the shortest two pieces of tiger tail, hold them together and slide a crimp on the end. Slide on one of the split rings and loop the ends of the tiger tail back through the crimp. Close the crimp with flat nose pliers and repeat for the other four pieces of tiger tail.


3. You’re ready to start adding beads--this is the really time consuming part! Start with the shortest length of tiger tail. Leaving a gap of a 4 inches, add a crimp to the strand. Add a spacer bead (if necessary), one of your beads, another spacer bead, and finally another crimp. You’re effectively making a bead sandwich!


4. Leave an inch or two gap, add the next bead using the same process as before, until you have only a 4.5-5 inches at the end of the strand.
Repeat until you’ve put beads on all six strands of your necklace, changing the size of the gaps on each strand for some variation.


5. Open a jump ring by twisting it (not pulling the sides apart) and add the clasp.


6. Fix the clasp to one end of the necklace and add the second jump ring to the other end. I decided to use an extender chain on this, so I can alternate the length of the necklace. The clasp and jump rings in this picture were from a broken necklace.


7. Enjoy your new necklace!

Linking up at:

Friday 13 May 2011

Cassette Tapes: Reuse and Refashion!

Everyone has the odd cassette tape (or ten) lurking around in their abode. A relic of the 20th Century, cassettes are rarely used these days, forsaken in favour of the CD and the mp3.

But it seems rather wasteful to just trash all those unwanted tapes, doesn’t it? 


Having found a pile of home-recorded cassettes that I didn’t want, I decided to do something with them. Repurposing always beats trashing!


Cassette tape bag
I made this using a tutorial on Instructables
I love the trashy, handmade look; the bag is quite floppy despite the sturdiness of the tapes so is a fun accessory to a slouchy, 80’s inspired ensemble!
Because I wanted a way of closing my bag, I changed the design slightly compared to the one in the tutorial. I also added a long strap, which I attached with big safety pins.
This bag makes use of the cassette casing, the cases and the tape inside.


Reel earrings
These were a little bit fiddly to make--mostly because of the rhinestones! I spray painted the reels silver and then glued flat-backed rhinestones around the edge.


Reel and chain necklace
Again, I spray-painted the reels on this one. I attached them to a plain chain and added short pieces of chain for effect.


Reel and beads cross choker
This time I joined some reels together into a cross shape, using thin ribbon. I added a jump ring to the top of the cross and put it onto a piece of bent wire to form the necklace. I added metallic beads and tape guides (the small plastic wheels) to finish off the piece.

Obviously these are only a few ways of reusing cassette tapes! A quick Google search will throw up tonnes of ideas and inspiration. How about a cassette tape lamp, bracelet, or wallet?
There are plenty of tutorials online--your only limit is your imagination!


Linking up at:

Sunday 8 May 2011

Tutorial: Beaded Safety Pin Earrings

Earrings can be made from all manner of objects, so long as they’re not too heavy on the ears!
These safety pin earrings are possibly the easiest - and quickest - to make.
They are also cheap, chic, and that little bit different!

Here’s how to make your own.


Time needed: 5 minutes

You’ll need:
2 Large safety pins
Beads*
2 Earring wires
Flat-nose pliers
Round-nose pliers

* Make sure your beads will fit onto the safety pins! 


1. Thread beads onto the pin.


2. Close the pin and squeeze the opening with flat-nose pliers so the pin cannot come undone.


3. Open the loop at the bottom of an earring wire using round-nose pliers. 


4. Thread onto the bottom of the pin and close.


5. Voila!


Variations:
  • How about a series of tiny beads?
  • Or make use of bead caps and spacer beads
  • Use different sized safety pins

Linking up at:

Wednesday 4 May 2011

Retro Craft Books


Recently I bought a few fantastic retro craft books from a local charity shop. At 50p each they were an absolute bargain, especially considering the content!


The Complete Book of Handicrafts is absolutely brilliant. Printed in the 70’s, it covers a plethora of crafts including crochet, rug-making, smocking, leatherwork, picture framing and much more! 


I’ve already found a heap of potential new projects. These mouse pincushions are adorable and definitely on my ‘to make’ list.

The Batsford Book of Sewing is another product of the 1970’s. This covers all nature of dressmaking procedures so as a self-taught dressmaker, I find it incredibly useful!

Shortcuts for Busy Dressmakers is similar to The Batsford Book of Sewing, but like the name suggests, it explains the quick way of doing things! Of course this is fantastic for any dressmaker lacking in time (or patience!)


This final book perhaps pushes the topic of this post from ‘retro craft books’ to ‘vintage craft books’!
Encyclopedia of Needlework was gifted to me a few weeks ago by my Nanny. (She always gives me cool stuff!)


It details a huge number of needlework methods and includes some beautiful colour plates. I was hesitant to read this book since I was afraid it might fall apart, but to my delight it has been digitised--find the book in its entirety at http://encyclopediaofneedlework.com/

Sunday 1 May 2011

Tutorial: Gothic Comedy Scarf

Nearly all magazines come with a handful of inserts that usually go straight in the recycling bin. But recently amongst the oft-unwanted junk was something interesting: a pamphlet for Joe Browns.

The brand in question has a large collection of to-die-for clothes and accessories, all of which are stylish, gorgeous, and practical with it!
One thing that caught my eye was the ‘Funky Buddha Scarf’. At £19.95 it isn’t particularly overpriced, but I’m one of those people that would rather save the money and spend a couple of hours making something for less!

So here is my take on the Funky Buddha Scarf:

‘Gothic Comedy Scarf’
And here is the original by Joe Browns:

As you can see, there are several differences between my version and the original!
Basically, I made this using things I had in my creative stash, rather than shelling out on fabrics, beads and whatnot.

I’m a bit of a goth at heart, so used some black cobweb lace left over from an old project. Instead of chunky beads I used some large jump rings, and the comedy mask charm has been floating around in my bead box for about a decade!

Since I’m all about sharing (and it’s so easy to make this), here’s a tutorial!


Time needed: 60-90 minutes

You’ll need:
60x150cm (approx) lightweight fabric (choose something that doesn’t fray)
Charm for centre of scarf
Bail for charm (I used a split ring from an old keychain)
6 large jump rings
Belly dance costume coins
Needle & thread
Scissors
Jewellery pliers


1. Hem your fabric on all sides if you wish (I didn’t because I could get away without doing it!) Put a bail on your charm if it doesn’t already have one, and thread onto the centre of the fabric.


2. A couple of inches from the charm, fix three of the jump rings around the fabric. It helps to twist the fabric here to keep it tightly together. Close the jump rings with pliers. These will stop your charm from sliding off the scarf.
Repeat on the other side of the charm.


3. Sew the coins to one end of the scarf, evenly spaced. I used 9 coins on each side.


4. Tea break!


5. Sew coins to the other end of the scarf.


6. Enjoy your new, cheaply-produced scarf!!!


Variations:
  • As with the Joe Browns scarf, try out large beads instead of split rings...
  • ...or put knots in the fabric.
  • Sew beads or trim to the ends of the scarf
  • Add three charms rather than one

Linking up at:
The Girl Creative Anything Related
Related Posts Plugin for WordPress, Blogger...